Performer Flying: Difference between revisions
SMacluskie (talk | contribs) |
|||
| Line 10: | Line 10: | ||
===Planning=== | ===Planning=== | ||
The brief was for a performer to climb one | The brief was for a performer to climb one of the frames and fall off from a height. Automation was not an option since we'd be touring to Dundee where they do not have any in house automation. We looked at doing a Human Counterweight Performer Flying and a double purchase system to lower the performer. | ||
Original "Renders" of the trick: | Original "Renders" of the trick: | ||
| Line 31: | Line 31: | ||
• Speed variable | • Speed variable | ||
• | • Safer if someone fell | ||
| Line 63: | Line 63: | ||
In the end we went with the human counterweight. | In the end we went with the human counterweight. The counterweight ladder was made of a scaff pole with ladder rungs borrowed from NTS. The ladder was doughty clamped on to the back of the movable tormentor in the Ath. The tormenter was screwed to the ground and packed out to prevent it moving. We did not have a need to fix the base of the ladder to the ground. | ||
[https://www.youtube.com/watch?v=W_byPiR2izU Here is a video of the trick from the evolution to show state.] | [https://www.youtube.com/watch?v=W_byPiR2izU Here is a video of the trick from the evolution to show state.] | ||
Revision as of 18:00, 10 May 2018
Spring Awakening 2018
For Spring Awakening the director wanted, Moritz, a character that commits suicide to fall off a high point of the set. The set was mainly built of 6m tall climbing frames, like the kind usually found in a gymnasium. The show also toured to Dundee Rep Theatre. This presented a lot of challenges for us.
This trick was taken on my students Yesha Subotincic West TSM, Reece Flynn Stager Super on Tour and counterweight, and Greig Buckley ATSM.
Planning
The brief was for a performer to climb one of the frames and fall off from a height. Automation was not an option since we'd be touring to Dundee where they do not have any in house automation. We looked at doing a Human Counterweight Performer Flying and a double purchase system to lower the performer.
Original "Renders" of the trick:


Video of tests of double purchase system.
Human Counterweight


Advantages:
• Speed variable
• Safer if someone fell
Disadvantages:
• Space for ladder
• Masking for counterweight
• 2 people at height
Double Purchase
Advantages:
• Flexible position for control point
• Only one person at height
Disadvantages:
• Twice as much rope
• Slow speed
• Huge amount so friction on rope
• More risk to performer
In the end we went with the human counterweight. The counterweight ladder was made of a scaff pole with ladder rungs borrowed from NTS. The ladder was doughty clamped on to the back of the movable tormentor in the Ath. The tormenter was screwed to the ground and packed out to prevent it moving. We did not have a need to fix the base of the ladder to the ground.
Here is a video of the trick from the evolution to show state.
Rigging
Glasgow
In Glasgow the rigging involved taking out a grid panel in the furthest offstage upstage right half panel. This allowed the counterweight line to run along the back of the tormentor and not rub in the grid. It then went to beam clamp on the short mid beam for the performer.
Dundee
The rigging in Dundee was slightly more complicated. Since we were controlling the trick from SL, more line was run in the grid. We also could not run the line from the bottom of the roof beams as Dundee had more fly bars closer together so the angle to where we needed to put the ladder meant we had to run the line from lower down and pick up the centre of the line.
Health and Safety
RA's and SSOW:
Rescue Plans:
Operation
Method Statement for the trick.
Glasgow
In Glasgow the trick was run with the Counterweight checking the performers harness. TSM would check Counterweights harness and the trick would be run between TSM and counterweight and performer with Rescuer present and in harness.
Dundee
Because the counterweight's ladder was set up SL in Dundee and TSM had to spot the trick from SR, The rescuer wore a set of cans and received a verbal clear over cans from the TSM that the performer was clipped in.
Difficulties and Solutions
In Dundee we had issues with the amount of pulleys that had to be put in and the twist that happened on them because of the nature of rigging that needed to happen. We had to get someone to bring some swivels though from Glasgow.
We also added a ratchet strap to the karabiner the held each pulley. This pulled the pulley down to the grid and stopped the bouncing that naturally occurs in this type of system.
The Jungle Book 2017
The Jungle Book was the Christmas show of 2017. There were 2 main performer flying sequences. The first one was a monkey to enter from SL fly in to centerstage and take Mowgli out to SL. The second was for Kaa the snake to enter centerstage on aerial silks. In consultation with Aerial Edge these tricks were ironed out and achieved the look they had in the show. Unibeam track was bought specifically for this show and now remains a stock item at RCS.
Click here to see the first (mini) test video of the Flying Monkey track system.
This trick was taken on by students Yesha Subotincic West, James Hamilton and Regan Kelly
Paperwork
The performer flying gear was set up on a table in the SL wing. We used a setting list to ensure everything was in place pre-show.
We had a particular check list for the performer flying in addition to the pre-show check list. One of these was filled out and signed every day. The completed lists were kept in the TSM Master folder. The checks in the morning took roughly 20-30 minutes to complete. The checks were done and hour before the hour call in order to leave room to fix any issues that may arise. 50 kg in the form of stage weights were put on each line every morning and we ran the flying monkey sequence from beginning to end.
As part of the pre-show checks we needed to check the rigging of the automation. In order to keep the checklist concise this document with a detailed explanation of each element of the termination on the automation line. This and all paperwork was kept printed in a folder on the TSM table in the SL wing. This also included a copy of every crew members running list, so theoretically someone could run the show off that folder. A TSM prompt copy if you will.
Along the same line of the Automation Rigging Document, a document explaining the elements and maintenance of the harnesses should let someone perform harness checks after reading this document.
The harness checks were done daily and there was also a reminder for fitting the harness on the performer. The performers became very comfortable with putting the harnesses on. By the time it got to shows it was a matter if handing the performer the harness in the correct orientation. The performer would then go and get the harness ready. The TSM or DTSM would hold each side connection point on the performers hips. There would be a verbal check that the performer is comfortable with the placement of the connection point. The performer would then tighten the legs and the TSM or DTSM would tighten the front webbing and perform all checks specified on the harness check lists.
The forces document below illustrates the thought that the team had to put in to considering the amount of forces that will be acting upon the performer flying system.
The sequences is best illustrated by the TSM master running list as most of the list involved the performer flying.
Programming
This show was automation heavy for a few parts of the show.
At first we thought this would mean that multi-targets and triggers would need to be used. But it was decided that for performer flying having total control of when the states fired was better suited.
Automation Cue Sheet
As there were a lot of cues that were done off-stage and did not concern any other department, another cue sheet was made to be given to the DSM. To avoid confusion between cues called by the TSM and DSM, the TSM called the deads as "In", "Clip In", "Out". The DSM called cue numbers.
DSM Cue Sheet
Programming Issues
Programming the states with stage weights simple enough.
As long as the acceleration and deceleration for all Axes were the same and all axes were traveling to their targets over the same time then there would be no issues and the weight would travel in a straight line to it's target.
See Automation Cue Sheet Cue 204 - 205
Even though the distance between all the Axes are different as they all travel to the next cue over 15s it travelled in a straight line.
This is important to know as it means that the issues that we had will make sense.
IMPORTANT
We found that when recording states, there is a prioritization system within them. As I recorded the cues we first entered DISTANCE (the next dead) for all axes and then we entered TIME (the state time) and the programme decided SPEED.
I found that when updating states and changing the DISTANCE the programme would keep the SPEED that had been decided initially and the variable that changed was the TIME.
This was an issue as the track and drop system required all axes to travel over the same time.
ALSO IMPORTANT
No solution was found for this other than to be aware that it is a problem and to simply re-record the State time.
Rope Swing
The rope swing was an idea that came about at the white card. It was initially supposed to be hanging off one of the pillars SL. This was quickly vetoed as that was more work that it was worth for workshop to build a pillar to support a rope swing for one simple trick. it was then talked about having the rope hang from a fixed point in the grid and be pulled and dropped from Prompt side flys. This was not a great solution since the trajectory of the rope Hugh Hodgart wanted was quite wide and could not be achieved from a fixed point without a very tall starting platform offstage and then there was the concern of the safety of the performer while landing. The only solution at this point was a compromise. We would use the performer flying automated track to "fake" a swing therefore making it a safer landing and Hugh would get a longer "swing" but only on one plane. The swing itself was initially tried with an upside-down TSM show box. This proved not to be high enough so we graduated to a small set of 3 treads. The trick still lacked the "oumph" Hugh wanted from the swing. The solution was for the performer to take a verbal GO from the TSM who would hear the automation cue called and be able to watch the track and give a go to the performer when the carrier had moved onstage enough that there would be an adequate amount of swing in the rope but not too much it made it unsafe for the performer to land. This was a matter of counting 2-3 seconds and giving the performer a verbal go.
Here is a link to a video showing the evolution of the Rope Swing and a breakdown of what is going on backstage and the final trick.
Flying Monkey
The brief for the flying monkey came back as far as the white card meeting. It was initially the idea to have the monkey fly in from SL, grab Mowgli and then both fly out to SR. This changed once Hugh the director got involved and he decided it made more sense for the Monkey and Mowgli to go back in the direction the monkey came from. It was also decided that Monkey would not grab Mowgli and it would be more of a "suggestion" of luring Mowgli to the Banderlog.


Click here for a video of the load testing of the system before putting people in it. Click here to see a video showing a breakdown of what's happening backstage during the performance.
Flying Snake
Kaa the snake in The Jungle Book made her first entrance by genie trap. The performer, Caroline Denis, had done aerial work in the past. It was suggested by Hugh Hodgart the director that show make an entrance by appearing above the stage on aerial silks. Once in discussion with Aerial Edge the circus school in Glasgow it was quickly decided that this would never be a safe trick even if the performer was a professional silks artist, which she was not. As this idea had been brought up after the final costings had been submitted, we could not afford the cost of 200 GBP for aerial silks. It was decided instead to fake the trick using a tumble harness and a piece of fabric.


Click here to see a video showing the evolution and a breakdown of what happens backstage during a show of this trick.
Health and Safety
The tricks performed were covered by 3 non generic Risk Assessments written specifically for the show. Copies of these can be found below, RA for performer flying with bump caps, RA for performer flying w/o bump caps and an RA for the rope swing.
With any performer flying there must be rescue plans and back up plans if the flying fails or the performers are uncomfortable. The rescue plans are shown below. The tallescope rescue did have to be used the first time we ran the Flying Monkey sequence with people in the rig. A change to a cue by a couple seconds caused the automation line termination to run into the pulleys. Luckily it was crew members in harnesses and they remained calm and brought themselves into the tallescope basket. Copies of these rescue plans were kept in the TSM Master folder on the TSM table SR.
The signal that was created if the performers were uncomfortable in the air or if the system did not work was in BSL since one of the performers was from the BA Performance in BSL Course. The sign translates to "Sign B", similar to Plan B but faster to sign in an emergency.

More information about Suspension Trauma follow the links below:
3. Video
Difficulties and Solutions
Programming
There were 2 issues that arose with the performer flying that could be solved from the automation desk.The first was actually the first time that we put people into the system instead of stage weights. It was a very exciting moment and until them everything had been working perfectly (good dress rehearsal, bad first performance, know what I'm sayin'). Basically one of the states had been changed by a couple of seconds and the state following that one that had been changes was the state to track the monkey and Mowgli back to SL. This was the most dangerous state as soft or hard limits couldn't be set to take into account that kind of tracking. The state was not recorded as "from previous state" but rather "from previous position" causing the lines to run up into the pulleys and jam. We activated the tallecope rescue plan and the crew members were able to climb into the basket and unclip themselves. The only damaged suffered by the system was the ends of the automation lines. We cut the lines swapped and isolated the damaged rigging and reset the zeroes ready to go again. The whole truss was brought in again and checked for safety reasons.


The second issue was during one of the final morning checks where we ran 100kg test weight through the monkey sequence (50kg each line), one state did not complete by a fraction of a second causing the same problem to happen again. The line was adjusted and the cue updated to prevent any further issues.

Noise
Since we had to swap rope swing to flying monkey coat hangers to snake drifts, there was a lot of fast work that had to happen backstage silently. As rigging gear isn't designed to be silent and as we were pressed for time we had to come up with other ways of silencing these changes other than slowing down or swapping gear. The first thing was to put carpet in the wing to stop noise of the drifts running on the ground. This worked very well for us. Next since we kept getting notes of noise during our fastest change we covered every item of rigging equipment that made metal to metal contact with black gaff in a effort to dull the noise. We can only assumed it worked as there were no notes on noise from that point onwards.

Time
The time it took to do each "scene change" was something that was found over time. They all had to be done quite quickly and there was a need to keep the performers in the air for as sort a time as possible while still making sure they were there in time to make their entrance. These changes and entrances were not rehearsed as they should have been leading up to tech and therefore were not run in time sequence until the first dress (would not recommend). We eventually found a system that worked. We went off LX cues called over cans so therefore the LX boom and lights could be programmed in. If this were to be done again, make sure that the changes and presets of the performers are times and rehearsed prior to tech and run in sequence during tech. It would also be advisable with a moving boom as we had to keep that boom on a fader so it could be turned off and on as necessary rather than going by LX cues.
All of the drifts were meticulously coiled and taped. We initially used scotch tape so the drifts could be ripped apart. We found however that this often left tape on the lines as there was not usually enough time to remove all the tape before the trick needed to happen. The solution to this was to use gaff taped the opposite way with a tab so all that needed to be done was to pull the tab and the tape would glide off.

There was also an issue of the drifts getting tangled and therefore when they would go out, on a couple of occasions, the cue would need to be halted to untangle the lines. This was not okay as they should be a able to go out smoothly with no tangles. The solution to this was to lay the coat hangers and the drifts in the wing prior to the change over. The drifts in particular were laid in a spiral pattern ensuring that there would not be a singe knot in them.

Building the system
There were 2 main hitches that came when building the system. This system was designed off one that was previously used before the new installation of the permanent winches on beams above the grid. The old system was for 2 line 3D flying however had elements that could be scavenged for this show. All the pulleys were from the old system simply bolted into the new pieces we had welded for this show.


The theory was with these 2 drawings was that the offset would permit the lines to be able to be next to each other but not rub on each other or the pulleys they ran through. It was a good theory but didn't quite work. The problems with this system were:
1 - The base plate of the first drawing were too small. The measurement was written down from the inside dimension of the automation beam and not the outside which it should have been. This was remedied by taking the foot plates off of unused automation beams and drilling and countersinking them so that flush bolts could hold them to the base plates and be flat against the bottom of the automation beam.

2 - Since we needed 2 automation lines on as close to the same pint SL-SR as we could get it we had to take them from different directions so they did not intersect. This caused an offset in the drop pulleys in the grid. This was unavoidable since they had to accept the lines from different directions. This was not foreseen until it was all up and rigged and we realized that the offset planned and literally welded into our system was wrong. This was fixed by remeasuring and drilling the holes in the beam feet and pulley holders accordingly.

3 - Since the truss was ratchet strapped to the grid and suspended on 2 chain hoists the system ad a little bit of give in it. This meant that if a ratchet strap or motor was slightly off a line would rub on a part of the system. We were constantly having to re-adjust when you heard a line rubbing. If this were to be done again try and make a way of doing this more direct to the adjustments can be avoided after the first time or be prepared to be undoing a lot of ratchet straps.
Gallery
-
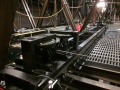
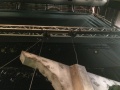 Truss track and carrier.
 -
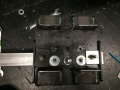 Bolts holding bar (1000mm long) spacing the carriers.
 -
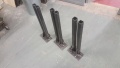 Freshly welded drop divert pulley mounts for below grid.
 -
 The drop lines view from the grid.
 -
 "What are you doing, put me down"
 -
 Monkey helps Mowgli flip.
 -
 "Surprise"


