Rope Access
THESE NOTES ARE ONLY FOR INFORMATION. IF YOU HAVE NOT BEEN FULLY TRAINED IN ROPE ACCESS (minimum IRATA Level 1), DON’T DO IT!
In the words of Q – “Always have an escape plan”. Before we start to do anything at height we must have a rescue plan, a method statement (approved code of practice), and a risk assessment. Rope access should only take place when an IRATA trained member of staff is present (currently only Steve & Malcolm).
The Equipment
The equipment we require for rope access is fairly extensive and specialised. The good thing about it is that if used properly it is highly unlikely to fail (most accidents are caused by user error). We require –
- 2x Ropes
- You need 2 static lines (NOT climbing ropes), on separate anchor points.
 A Harness

- This is heavier duty and bulkier than your average fall arrest harness. It’s well padded and designed specifically for work positioning. As with all harnesses you should try and tuck back straps where possible, and ensure that the karabiner gate is locked shut. It’s also good to have you harness slightly tighter than comfortable on the ground – you’ll be thankful for it when you’re in the air!
- 3x Cowstails with Karabiners
- These are simply bits of dynamic line with a carabiner on one end. They should be about the length of your arm, and be terminated onto your harness using figure of 8 loop knots. You should have one on your left side and two on your right.
 A shock absorbing backup safety device (ASAP)

- This is your safety. Ensure it stays at roughly head height at all times, and never goes below your waist. Any lower and you can increase your fall factor to a dangerous level. This attaches to your dorsal or sternal harness point.
 A Croll (Up Gear)

- This gets secured through your harnesses chest karabiner, and is secured upright using a croll strap. Ensure it is closed whenever it’s not in use to avoid potential damage. Soem modern harnesses have the croll built in and so the need for a croll strap is therefore unnecessary.
 An Ascender (Up Gear)

- This is attached to your middle cowstail and helps you get up ropes. It is in essence a croll attached to a handle with a footloop attached on the bottom.
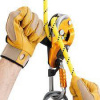 A Descending Device (Down Gear)

- This is a Petzl Rig. It enables you to descend in a safe, controlled manner. It is attached using a karabiner onto your belt and it is vital you understand how to thread it up correctly before attempting to thread it up at height.
 ID (Down Gear)

- This is Petzl ID. Slightly larger than the Rig with an autolock function should you try to descent too quickly. One of these can be found on the Tallescope Rescue Kit permanently installed in the grid.
 MGO Hooks and Shock Absorbing Lanyards

- We have 1 set of these in stock. They're particularly useful for truss work, and climbing the tormentors. It's vital that you never attach one hook to the structure and the other to your harness.
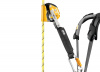
 Work at Height Helmet

- This is different from a standard climbing helmet, in that it must meet the requirements of EN397 (the current European standard for industrial safety helmets) to be considered. Although they look similar, they are not!
Wearing the harness
The Navaho fast ones are great! Straps should be doubled back on themselves, especially the waist and leg ones. Ensure the croll is attached to the chest point (either on the same karabiner or on a separate one, through the chest and waist securing loops). Ensure the fit is snug (some prefer too tight on the ground), this will make is easier to use in the air.
Empty your pockets! Ensure that all tools are attached via lanyards.
Get a competent buddy to check your harness and attachment points, paying particular attention to the screwgates on karabiners and straps on the harness. Once again, check your pockets.