Reusable Progressing Wound (Hand): Difference between revisions
Ikilbride1 (talk | contribs) No edit summary |
Ikilbride1 (talk | contribs) No edit summary |
||
| Line 22: | Line 22: | ||
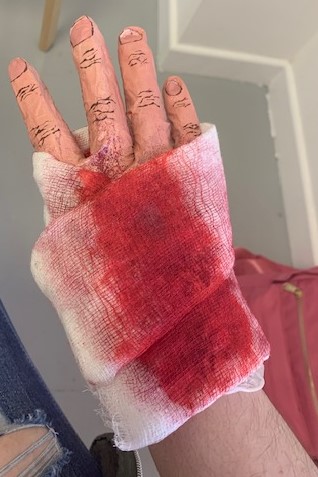
4. Cover the bandages with paint/fake blood + wrap around glove, sticking as you go. | 4. Cover the bandages with paint/fake blood + wrap around glove, sticking as you go. | ||
5. Repeat 1-4 with all pairs of gloves, increasing the amount of bruising and gore each time. | 5. Repeat 1-4 with all pairs of gloves, increasing the amount of bruising and gore each time. | ||
[[File:01 Hand.jpg]] | |||
[[File:02 Hand.jpg]] | |||
[[File:03 Hand.jpg]] | |||
[[File:04 Hand.jpg]] | |||
Notes | Notes | ||
Mixing the paint with liquid latex should prevent cracking and mean that the glove can be wiped down with antibacterial wipes if needed | Mixing the paint with liquid latex should prevent cracking and mean that the glove can be wiped down with antibacterial wipes if needed | ||
Revision as of 10:20, 19 November 2020
Materials needed:
Latex gloves – 4 min.
Bandages
Liquid Latex
Paint
Fake blood
Cosmetic powder
Method:
1. Mix paint to a base skin tone matching wearer. Add a small amount of liquid latex to this to prevent cracking and paint onto the glove.
2. Mix paints using the same method of adding some liquid latex to add details to the hands – fingernails, knuckles, shading between fingers.
3. Create a bruised base for the wound on the palm of the glove – be sure to spread wider than where the bandage will cover so that it doesn’t get covered completely with the bandages.
4. Cover the bandages with paint/fake blood + wrap around glove, sticking as you go.
5. Repeat 1-4 with all pairs of gloves, increasing the amount of bruising and gore each time.
Notes
Mixing the paint with liquid latex should prevent cracking and mean that the glove can be wiped down with antibacterial wipes if needed


