Genie Trap: Difference between revisions
No edit summary |
|||
| Line 3: | Line 3: | ||
==Installation== | ==Installation== | ||
Equipment Used | '''Equipment Used | ||
''' | |||
2 - Beam Clamps | 2 - Beam Clamps | ||
| Line 23: | Line 23: | ||
1 – Chain hoist | 1 – Chain hoist | ||
==Method== | |||
Create a bridle above the grid using the 2 beam clamps, 2 clutch chains, 4 shackles, 1 master link and 2 strops; ensure point above grid when strain is put on bridle. | Create a bridle above the grid using the 2 beam clamps, 2 clutch chains, 4 shackles, 1 master link and 2 strops; ensure point above grid when strain is put on bridle. | ||
| Line 80: | Line 80: | ||
- Check locking pin is in the slider handle. | - Check locking pin is in the slider handle. | ||
==Use in Shows== | ==Use in Shows== | ||
Revision as of 16:06, 19 May 2017
Dimensions
Installation
Equipment Used 2 - Beam Clamps
2 - Clutch Chains
2 - Master Links
2 – 0.5m round strops
20 - Shackles
1 - 3m 2tonne drift
5 - 1.5m drifts (with sheaths)
4 – 3m round strops
1 – Chain hoist
Method
Create a bridle above the grid using the 2 beam clamps, 2 clutch chains, 4 shackles, 1 master link and 2 strops; ensure point above grid when strain is put on bridle.
Connect the 3m drifts and the 5 drifts with sheaths together using shackles.
The connected drifts then need pulled up through the grid to attach to the point created by the bridle.
Clip on the chain hoist to the drifts from the tallescope.
(These instructions are assuming the trap is in place already in the floor)
In the pit open the trap slider, bring up lifting plate and remove weights from the cradle, lower plate again.
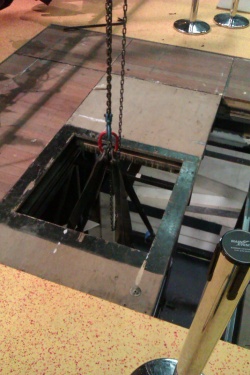
Choke the 4 3m strops around the top bars inside trap and connect the strops to the hook of the chain hoist.
Remove the palate beside the trap to allow space to move.
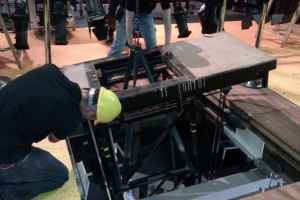
Use the chain hoist to raise trap out of floor, when above floor level attach rope to bottom of trap to swing it onto floor.
Notes 1. It would be preferable to use a single long drift, however none we have in stock are strong enough, if a drift was to be bought it would need to be roughly 11m .
2. To fit the drift though the hole in the grid, therefore the hole had to be bent slightly, it is probably best that this does not happen too often as it damages the grid; if a new drift was to be bought it would need to have a narrow enough eye and choke to fit through.
Operating Genie Trap
Before operating the trap, unsure that the slider handle lock pin is in, the trap riser brake is on, the correct weight is added and the Perspex sheeting is in place. Have a spotter on the deck to ensure safety and the prop (length of box metal) on standby.
For Raising a Performer
- Once all of the above has been checked, allow performer on to the platform.
- Release locking pin from slider handle
- Once the green light has gone, turn the slider handle 3 ½ times, and release brake on the riser.
- Wait until the slider is fully open and pull down on the rope until the riser is level with the stage. Apply brake as soon as possible.
- Check locking pin is in the slider handle.
- Place prop between the floor and the top of the trap.
For Lowering a Performer
- Remove prop.
- Once all of the above has been checked, allow performer on to the platform.
- Wait until green light has gone (spotter and DSM are happy)
- Release locking pin on slider handle. Release brake on riser and pull rope up. Crew member on the entrance of the trap can assist by pulling the platform down, and then making sure performer stays on platform until brake is applied.
- Turn slider handle 3 ½ quickly with force until slider is in place.
- Check locking pin is in the slider handle.
Use in Shows
Moving trap for Aladdin
This is how the genie trap was put in place for Aladdin Panto 2011
The first thing that was done as part of the panto fit up was to lower the genie trap into place. The first that needed done was to find where the center point of the genie trap slider would be on stage, and make a bridal on the grid above this point. We made this using beam clamps and clutch chains. A shackle was then attached to the hook of the chain hoist and a rope dropped down to lift it up and attach to the point on the bridal.

Four slings were wrapped around the lid of the genie trap as this needed to be lifted on top of the genie trap mechanism and bolted on before it was lowered into the pit.

Once the lid was bolted on, ropes were attached to the genie trap to help guide it and the chain hoist (operated from the tallescope) was used to lift the genie trap off the ground slightly. On the first attempt at lowering it down, only one piece of staging was removed, which at the time seemed enough, but whilst lowering it we found that the trap had to be moved up and down stage to fit in; so the genie trap was lifted out again and another piece was taken out.

Just before getting it into its final position, packers needed placed between the beams in the stage and the trap to make it level with the stage. In the pit, a piece of 8by4 steel deck was placed underneath it with small screw jacks, to be able to change the height of the legs so the genie trap wasn't just floating in the pit.

Moving Trap during Tommy
For Tommy we had to move the trap out of the position of the gene trap as it was used for Aladdin and move it two palates up, we went about taking it out in much the same manner as it was put in for Aladdin, however we used a different selection of equipment which seemed easier.