Terrible News, Terrible Weather: Difference between revisions
No edit summary |
No edit summary |
||
| (9 intermediate revisions by the same user not shown) | |||
| Line 1: | Line 1: | ||
[[Category:Productions]] | [[Category: Productions]] | ||
[[Category:CPP]] | [[Category: CPP]] | ||
[[Category: Chandler]] | |||
[[Category:Chandler]] | [[Category:Chandler]] | ||
This production required 3 single 'drips' that started on cue at different times throughout the performance. We also had to create a rain shower that consisted of 12 drips that all started at the same time across the whole performance space. | |||
[https://flic.kr/s/aHskkfEAKJ Click Here] for some productions pictures. | |||
== 3 Manual Drips == | |||
We used 1L Water bottles with the 'Hozelock adaptors' | We used 1L Water bottles with the 'Hozelock adaptors' siliconed to the lid which we attached to the cat-walk using tie-wraps. We set the speed of the drips using the twist valves attached to the adaptors and left the water to drain out and empty the bottles. We cut a large whole in the bottom of the water bottle to allow us to fill them on cue and the drip will continue to flow at the speed we set previously. However, this does mean that the water will not stop until the bottle is empty. | ||
[[File:IMG_2167.JPG|400px]] | [[File:IMG_2167.JPG|400px]] | ||
We then added our hose line that ran along a bar above the acting space. We attached the hose using LX tape and also attached the stop connector to the end of the hose pipe. Once the hose pipe was mounted we used the Tolescope to be able to attach the Hozelock adapter in the correct positions by putting a hole in the pipe and forcing them into the hole by hand. I then surrounded the join with some bathroom silicone to avoid any leaks or movement from the adapters. | |||
== 12 Rain Shower Drips == | |||
We then added our hose line that ran along a bar above the acting space. We attached the hose using LX tape and also attached the stop connector to the end of the hose pipe. | |||
'''ENSURE THAT THE WATER TANK IS ABOVE THE LINE OF DRIPS AT ALL TIMES, THIS CREATES PRESSURE TO ALLOW THE WATER TO FLOW THROUGH THE HOSE. | |||
''' | |||
Once the hose pipe was mounted we used the Tolescope to be able to attach the Hozelock adapter in the correct positions by putting a hole in the pipe and forcing them into the hole by hand. I then surrounded the join with some bathroom silicone to avoid any leaks or movement from the adapters. | |||
[[File:IMG_2169.JPG|400px]] | [[File:IMG_2169.JPG|400px]] | ||
| Line 25: | Line 38: | ||
[[File:IMG_2172.JPG|400px]] | [[File:IMG_2172.JPG|400px]] | ||
[[File:drips.png| | [[File:drips.png|1200px]] | ||
| Line 34: | Line 47: | ||
[[File:IMG_2240.JPG|400px]][[File:IMG_2241.JPG|400px]][[File:IMG_2242.JPG|400px]][[File:IMG_2243.JPG|400px]] | [[File:IMG_2240.JPG|400px]][[File:IMG_2241.JPG|400px]][[File:IMG_2242.JPG|400px]][[File:IMG_2243.JPG|400px]] | ||
Hose Connector:[[File:hose connectors.png|400px]] (Aprox £1.00 each) | |||
Water Tank Coupler:[[File:rain.png|400px]] (Aprox £3.00 each) | |||
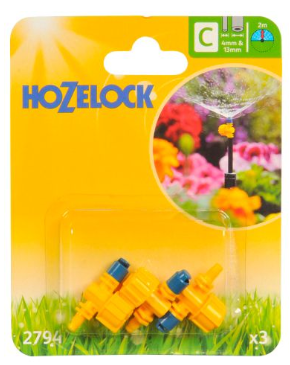
Hozelock Drip Adapters: [[File:hose adaptors.png|400px]] (Aprox £2.00 each) | |||
Latest revision as of 09:55, 5 October 2015
This production required 3 single 'drips' that started on cue at different times throughout the performance. We also had to create a rain shower that consisted of 12 drips that all started at the same time across the whole performance space.
Click Here for some productions pictures.
3 Manual Drips
We used 1L Water bottles with the 'Hozelock adaptors' siliconed to the lid which we attached to the cat-walk using tie-wraps. We set the speed of the drips using the twist valves attached to the adaptors and left the water to drain out and empty the bottles. We cut a large whole in the bottom of the water bottle to allow us to fill them on cue and the drip will continue to flow at the speed we set previously. However, this does mean that the water will not stop until the bottle is empty.
12 Rain Shower Drips
We then added our hose line that ran along a bar above the acting space. We attached the hose using LX tape and also attached the stop connector to the end of the hose pipe.
ENSURE THAT THE WATER TANK IS ABOVE THE LINE OF DRIPS AT ALL TIMES, THIS CREATES PRESSURE TO ALLOW THE WATER TO FLOW THROUGH THE HOSE.
Once the hose pipe was mounted we used the Tolescope to be able to attach the Hozelock adapter in the correct positions by putting a hole in the pipe and forcing them into the hole by hand. I then surrounded the join with some bathroom silicone to avoid any leaks or movement from the adapters.
On the end of the hose we fitted a garden Hose to Tap connector that we bought from B&Q which let us attach the hose to the water tank. I used silicone to seal the connection from the tap to the water tank as well as using washers.
Once this was all connected we had to fill the tank with water and turn it all on. We then had to work our way along the hose adjusting the drips to the correct flow that we needed. This can be quite messy so I would recommend putting buckets underneath the drips to catch the water that falls.
Some Production Pictures using 12 drips and 3 individually controlled drips:
Hose Connector: (Aprox £1.00 each)


