Beauty and the Beast Panto 2012: Difference between revisions
No edit summary |
|||
| (70 intermediate revisions by 5 users not shown) | |||
| Line 25: | Line 25: | ||
|'''Lighting Designer''' | |'''Lighting Designer''' | ||
|[[Roy Herd]] | |[[Roy Herd]] | ||
|- | |||
|'''Assistant Lighting Designer''' | |||
|[[Oliver Gorman]] | |||
|- | |- | ||
|'''Sound Designer''' | |'''Sound Designer''' | ||
| Line 56: | Line 59: | ||
*'''Production Electrician''' - [[Neil Foulis]] | *'''Chief Production Electrician''' - [[Neil Foulis]] | ||
*'''Deputy Production Electrician''' - [[Michael Parkin]] | *'''Deputy Production Electrician''' - [[Michael Parkin]] | ||
*'''Lighting Operator''' - [[Oliver Gorman]] | *'''Lighting Operator''' - [[Oliver Gorman]] | ||
| Line 68: | Line 71: | ||
*'''Stage Crew''' - [[Second year Designers]] | *'''Stage Crew''' - [[Second year Designers]] | ||
*'''Fit up Crew''' - [[First Year PTM Students]] | *'''Fit up Crew''' - [[First Year PTM Students]] | ||
*'''Crew | *'''Crew Chief''' - [[Kev Murray]] | ||
=Fit Up Images= | =Fit Up Images= | ||
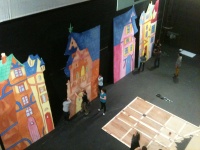
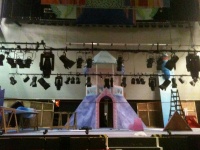
[[Image: PantoFitUp1.jpeg|200px]] [[Image: PantoFitUp2.jpeg|200px]] [[Image: PantoFitUp3.jpeg|200px]] [[Image: PantoFitUp4.jpeg|200px]] [[Image: PantoFitUp5.jpeg|200px]] [[Image: PantoFitUp6.jpeg|200px]] [[Image: BATB3.jpeg|200px]] | [[Image: PantoFitUp1.jpeg|200px]] [[Image: PantoFitUp2.jpeg|200px]] [[Image: PantoFitUp3.jpeg|200px]] [[Image: PantoFitUp4.jpeg|200px]] [[Image: PantoFitUp5.jpeg|200px]] [[Image: PantoFitUp6.jpeg|200px]] [[Image: BATB3.jpeg|200px]] [[Image: PantoFitUp7.jpeg|200px]] | ||
[[Image: PantoFitUp7.jpeg|200px]] | |||
=<span style="color: #730063;">'''Technical Stage Management'''</span>= | =<span style="color: #730063;">'''Technical Stage Management'''</span>= | ||
| Line 86: | Line 87: | ||
==Masking== | ==Masking== | ||
[[Image: B&TB_Masking.jpg|600px]] | [[Image: B&TB_Masking.jpg|600px|right]] | ||
====Wings==== | |||
The masking for the panto required that the wings be completely masked, yet quickly and safely accessible for large numbers of cast and large props (e.g. Hairdresser’s chair, sweetie truck); the stage also had to remain quite open. | |||
This was achieved using 4 pairs of doglegs (see Masking plan) the frames were pulled out on hemp lines to the grid and the 4x12 legs tied on. Importantly the dog legs were only tied onstage far enough to mask the entrances and the excess was doubled back. | |||
'''(Note: There are only 6 dog leg frames in stock – we constructed 2 extra, using scaff and key clamps)''' | |||
====Borders==== | |||
5 Borders were used for this performance | |||
*Winch Bar – 16x5m | |||
*CW8 – 16x5m (with 1.8m Bar extensions) | |||
*Hemp Bar between CW12 and CW13 – 12.2x3m (On scaff bar made up of two of the 6.4m lengths joined with long key clamp) | |||
*Hemp Bar between CW15 and CW16 – 16x5m (On scaff bar made up to 14m using 3 scaff lengths and two long key clamps) | |||
*CW24 – 16x5m (with 1.8m bar extensions) | |||
'''All Borders are conduited''' | |||
====Masking Notes==== | |||
A single 4x8 hard masker (covered in a large piece of black serge tat) was propped up using a stage brace and stage weight. This was to mask the offstage entrance into the USL tower when the door in the tower was used as an entrance and exit offstage. It was placed tight against the tower behind the 3rd soft dogleg masking. | |||
The entrance behind the Door USC in the main tower had a black tat curtain behind it to mask any light spill from void entrance or platform ladder safety lamp. | |||
A 10x3m border was tied along the back of the pit-lift to mask off the main area of the pit and the trap entrance there. | |||
==Notable Set Elements== | ==Notable Set Elements== | ||
===Dungeon Trap=== | ===Dungeon Trap and Walk up Treads=== | ||
=== | |||
A trap was used DSC during the final scene of Act 1; the performer came up from underneath it. It had a standard trap door which was pushed open from below, however under this there was a metal grill as this was supposed to be the entrance to the “Dungeon”. To open it the performer below had to push up through the grill and heave the top door open (the direction then had another cast member pulling open the grill) as this was a bit of a tricky manoeuvre, the cast member was given plenty of time to practice and become comfortable. | |||
Below the trap the walk up treads were used with the long section from the trap down to a 8x4 steeldeck on 982mm legs and down from this the short set of corresponding treads . This was installed by Construction. | |||
===Folding Towers=== | |||
There were three towers in the set which trucked on the stage and folded or unfolded for different scenes. | |||
The tall 5 sided tower set USR opened up into the “Hall”, it was moved by 2 cast members and 1 crew member in costume, to open it was rotated to CS and then opened from there. It was refolded with a cast member inside, so a handle was added by the door to aid his balance. | |||
The 2 DS towers started off as the Chateau Gates with two flown sections completing the “wall”, these were then flown out and the towers folded and taken to each side of the stage, these towers were more tricky to manoeuvre as while they were shorter that the USR Tower, they were heavier and bulkier, also to create the desired effect they had to move together, so required plenty of practice was required. The towers were moved by 1 crew member and 2 cast members to each tower. For the Maze scene in Act 2 the towers were rotated to reveal one side which was painted to look like part of the maze setting. | |||
===Flown Elements=== | ===Flown Elements=== | ||
===Automated Truss=== | ===Automated Truss=== | ||
There were two 4m pieces of square truss that were flown on the Automation winches; these were to fly in during the show at different angles for lighting effects. | |||
[[Image:Automation_B&TB.JPG|800|Centre]] | |||
The Points are from SR to SL (7600,-4200), (7600,-800), (7360,800) & (7360,4200). '''(Up CL, SR-SL)''' | |||
The two sections of truss sat upstage above the Chateau, all four winches were required to create the desired effect during flying. However the winches could only sit side by side in the centre section of the grid; as such the truss was slightly staggered in order to fit the winches in. The automation lines ran straight down to the truss and were attached onto the truss by a short strop and the wedge socket. The automation was operated from the flyfloor with a direct line of sight to it from there. | |||
===Snow Drop=== | |||
[[Image:B&TB_Snow_Drop.JPG|400px|right]] | |||
A vital effect for one of the scenes in the second Act was snow falling downstage, the original plan was to use Snow machines (see Lx) but these ended up being too loud for the scene, TSM was therefore asked to come up with an alternative. | |||
A carpet “bag” was stapled onto two short lengths of wood (one at each end); small grummets were screwed onto these lengths to tie the lines to. The bag was then hung from 4 lengths of sash (2 on each US and DS) on the centre of the counterweight bar. Large slashes were cut into the bag on the DS edge for the snow to fall through. A line was tied to the DS edge and then ran up through small pulleys (the black/grey ones not the bronze ones – they squeek!) to the flyfloor. When the line was pulled the US edge pulled up shifting the snow to the slashes in the bag through where it fell to the ground below. | |||
'''Equipment Required''' | |||
*x1.5x1m carpet with slashes in one side | |||
*x2 lengths of wood, roughly 1.5m | |||
*Staples | |||
*x4 Screw on grummets | |||
*x4 1m lengths of sash | |||
*x1 12m length of sash | |||
*x4 small single (black/grey from stock) pulleys | |||
*Cable ties | |||
==="Chateau Crumble"=== | |||
During the final scene of the first Act the Chateau is required to “Crumble” to create this effect some elements of the set fell and wobbled. The image below shows most of the mechanisms and their locations. | |||
[[Image:B&TB_Chateau_Crumble.JPG|800px|centre]] | |||
'''Tipping Towers''' | |||
[[Image:B&TB_Tipping_Tower2.JPG|200px|right]] | |||
The towers were simply bolted onto the back of the US Flats as a pivot point; they hit off the bracing behind the flat so could not fall too far. They were also braced to the flat to stop them falling forward of back. We later added a pin to hold them in their upright position until it was required for them to move as a safety. Operated from behind the US flats. '''(NOTE: door sections in onstage left and right void panels had to be opened.)''' | |||
''Hardware Required'' | |||
*X1 T-Nut (to screw pin into) | |||
*X1 Bolt screw eye (as pin) | |||
*X1 Round headed bolt (pivot point) | |||
*X1 Square washer | |||
*X1 Nylock nut | |||
'''USL Turret''' | |||
[[Image:B&TB_USL_Turret_and_Beast_Tower.JPG|300px|right]] | |||
The turret fell forward and stopped at an angle, it was hinged off the flat and made in such a way that it wanted to lean slightly forward even when pulled upright. It was held upright by a line which was tied off to the back of it and ran down the back of the flat, it went through one pulley to keep the line neat and was held in the upright position by putting a loop in the line over a cleat. When it was to fall this line was taken off the cleat and let run, it was tied off to a screw eye so the tower could only fall so far. Operated from inside the USL tower. | |||
''Hardware Required'' | |||
*x1 8m length of thin white sash | |||
*x1 pulley block screwed to flat | |||
*x1 hinge | |||
*x2 Screw eye | |||
*x1 small cleat | |||
'''USL Beast Tower''' | |||
The tower fell forward onto the beast at the end of the Act, this was operated by the same operator as who let run the USL Turret from inside the USL Tower. It was very simply knocked by there being a small hole in the flat through which was pushed a clear rod which knocked it over, the tower was hinged to the floor with a large T-hinge (a smaller hinge did not work as it ripped easily from the arex – the light material all the turrets and features were made of- if the tower twisted slightly as it fell). We also had a smallholder for the rod made and attached to the flat as we kept loosing it! | |||
''Hardware Required'' | |||
*x1 T-hinge | |||
*x1 clear rod with stopper on one end | |||
'''USR Turret''' | |||
[[Image:B&TB_USR_Turret.JPG|250px|left]] | |||
This was operated in much the same way as the USL Tower, with a line cleated then tied off. However the line ran into the USR Tower which during one scene unfolded into the “Grand Hall”; as such the line had to be discrete. We diverted it down close to one of the joins in the flat, we also had to make a small hole in the Arex feature to run the line through, as when it was just run down the join between two features it kept getting trapped. | |||
This was operated by a performer who had been in the tower when it folded back up in the previous scene. | |||
''Hardware Required'' | |||
*x1 8m length of thin white sash | |||
*x2 pulley block screwed to flat | |||
*x1 hinge | |||
*x2 Screw eye | |||
*x1 small cleat | |||
'''SR Dormer''' | |||
[[Image:B&TB_SR_Dormer.JPG|300px|right]] | |||
This dormer window section fell forward, it had a control line that held it in place throughout the rest of the show and stopped it falling too far, however it had to be knocked forward with a push stick. It was operated from inside the leaning flat section on the front of the Chateau. | |||
''Hardware Required'' | |||
*x1 2m length of thin white sash | |||
*x1 pulley block screwed to flat | |||
*x1 cleat | |||
*x1 screw eye | |||
*x1 thin rod with handle to push (we used one of the handles for lifting stage pallets) | |||
'''SL Dormer''' | |||
This dormer window section shifted from side to side during the scene. It was very simply operated, set on a pivot point, it was pushed from side to side from inside of the SL of the leaning flat section on the front of the Chateau. Workshop cut a large hole in the flat behind it and screwed a handle onto the inside of the dormer section to push it. | |||
===Rubble Drop=== | ===Rubble Drop=== | ||
=== | |||
[[Image:B&TB_Rubble_Drop.JPG|400px|right]] | |||
During the “Chateau Crumble” scene the director requested rubble to fall from above the castle into the archways on either side of the main Chateau tower. To do this we rigged 4 buckets on 2 trapeze bars (to allow easy resetting – the counterweight bar could not come into a working height due to the tower); from the base of these buckets we ran lines up to the counterweight bar and off to the nearest flyfloor. When these lines were pulled, the buckets tipped and the lightweight “rubble” fell out. | |||
''Equipment Required'' | |||
*x4 Plastic Buckets | |||
*x2 long (12m) lengths of sash | |||
*x10 short (1m) lengths of sash | |||
*x6 small pulleys | |||
*Cable ties | |||
*x4 6m drifts | |||
*x2 1m (roughly) aluminium scaff pipes | |||
*x8 barrel clamps | |||
*x8 1 tonne shackles | |||
*Enough “rubble” to fill all four buckets (stage management source/make) | |||
===Pit Bridge=== | |||
Access was required from the stage straight into the auditorium; as such we put in a pit bridge. | |||
[[Image: Pit_bridge.jpg|800px|centre]] | |||
'''Equipment Used''' | |||
*x1 8x4 Steel deck | |||
*x14x2 steel deck | |||
*x4 982mm scaff legs | |||
*x2 2100mm scaff legs | |||
*x2 Doughty tank Traps | |||
*x2 Half key clamp feet | |||
*x1 4 step treads (1220 tread width) | |||
*x4 Hinges (to attach treads to front of stage and to Steel deck) | |||
*x2 M10 Bolts and nuts | |||
=<span style="color: #00A5C6;">'''Electrics'''</span>= | =<span style="color: #00A5C6;">'''Electrics'''</span>= | ||
== LX Photos == | |||
[[File:IMG 0020.jpg|200px]] [[File:IMG 0022.jpg|200px]] [[Image: PantoFitUp3.jpeg|200px]] [[File:IMG 0029.jpg|200px]] [[File:IMG 0030.jpg|200px]] | |||
[[File:IMG 0033.JPG|200px]] [[File:Panto 2012 LX truss.jpeg|200px]] [[Image: PantoFitUp7.jpeg|200px]] [[File:Panto pre-set.jpeg|200px]] [[File:IMG 0061.JPG|200px]] | |||
== LX Equipment == | |||
'''Generic Lamps''' | |||
*SL 15-32 - 21 | |||
*SL 10* - 4 | |||
*SL 19* - 12 | |||
*SL 23-50 - 16 | |||
*SL 26* - 4 | |||
*PARNEL - 1 | |||
*1.2K Fresnel - 33 | |||
*1.2K PC - 8 | |||
*2K Fresnel - 9 | |||
*5K Fresnel - 1 | |||
*PAR 64 - 26 | |||
*Short nose PAR - 2 | |||
*S4 PAR - 54 | |||
*Birdies - 10 | |||
*Coda FLood - 24 | |||
*Starlette baton - 4 | |||
*Orion Groundrow - 8 | |||
'''Special Lighting Effects''' | |||
*Vari Lite 1000 tsd - 4 | |||
*2 Robert Juliet Korrigan 1200W HMI - 2 | |||
*Le Maitre MVS Hazer - 1 | |||
*Jem ZR44 Smoke Machine - 2 | |||
*Look Solutions Viper 2.6 Fog Machine - 1 | |||
---- | |||
Snow Effect: | |||
The Director requested a snow effect, after much research on foam snow effects, I settled on an affordable option, | |||
that looked very effective. | |||
This was Hired from Clyde Productions. | |||
[[File:Soundlab Snow Machine.jpeg|400px]] [[File:Snow.jpeg|400px]] | |||
The downside of this affordable option made it very noisy, so unfortunately this was cut from the quiet scene, | |||
though still used in the walk down. | |||
---- | |||
== Flown LX Truss== | |||
[[File:IMG 0030.jpg|400px]] [[File:LX truss.png|600px]] | |||
This was more of a challenge for TSM, I had to Source the truss for the show, and safely wire up the Ropelight. | |||
(power connectors were bought for this from TLC.com) | |||
After discussing the truss with TSM, we hung it in a diamond angle, to get more effect from it. | |||
The Truss was sourced from Clyde Productions, We used 2 4M sections of 'Metalworx' Truss | |||
---- | |||
== Scrollers == | |||
The lighting Design for this show called for scrollers, Due to budget myself and another crew member got 6 of the Conservatoires scrollers to work. | |||
[[File:8pro1.jpg|400px]] | |||
Unfortunately some of them broke down during the show some of them broke down, | |||
The production manager found LX more money to hire in 2 Scrollers from Blue Parrot, these worked much better. | |||
---- | |||
== Decorated Auditorium == | |||
[[File:IMG 0033.JPG|800px]] | |||
To give the audience a more festive feel, the Lighting Designer decided to decorate the auditorium, with coloured Festoon. | |||
[[File:Festoon harness bc lampholders 2 large.jpg|400px]] | |||
and star shaped paper lampshades from Ikea. | |||
These came with their own fittings, however they were unsuitable for what we needed, so we took the clips, | |||
(that hold the lampshade to the fitting, and in shape) and attached them to pendant fittings from venue stock. | |||
[[File:IMG 0022.jpg|500px]] | |||
The Festoon Came from Venue Stock, and the Festoon lamps, We borrowed from Scottish Ballet. | |||
---- | |||
== Hair dressers Chair == | |||
This was a make by Props, and was to be looked after by Electrics. the Diagram below ensured no mistakes in the charging procedure. | |||
[[File:IMG 0045.jpg|400px]] [[File:IMG 0056.JPG|400px]] | |||
---- | |||
== Lighting Plan == | |||
'''Designed by [[Roy Herd]]''' | |||
[[File:Screen Shot 2013-02-02 at 21.23.10.png|1000px]] | |||
=<span style="color: #639C18;">'''Sound'''</span>= | =<span style="color: #639C18;">'''Sound'''</span>= | ||
= | '''Provisional Kit List''' | ||
'''Cabled Microphones''' | |||
* 2 x Sennheiser e614 Condenser Mic + clip | |||
* Shure SM57 Dynamic Mic + clip | |||
* Audix D6 Bass Mic | |||
* Shure SM81 Condenser Mic + clip | |||
* D112 Kick Drum Mic + clip | |||
* Shure Beta 57-A Vocal/Instrument Dynamic Mic + clip | |||
* 2 x Sennheiser e604 Drum Dynamic Mic + drum clip | |||
* 3 x Shure SM57 Dynamic Mic + clip | |||
* Shure SM58 Dynamic Mic + clip | |||
* Shure SM58 Vocal Dynamic Mic + clip | |||
'''DI's''' | |||
* BSS DI Box 90 | |||
* 2 x Behringer Ultra-DI 20 | |||
'''Radio Beltpack Transmitters''' | |||
* Shure UR1 (BP1) | |||
* Shure UR1 (BP2) | |||
* Shure UR1 (BP3) | |||
* Shure UR1 (BP4) | |||
* Shure UR1 (BP5) | |||
* Shure UR1 (BP6) | |||
* Shure UR1 (BP7) | |||
* Shure UR1M (BP19) | |||
* Shure UR1M (BP20) | |||
* Shure UR1M (BP21) | |||
'''Band Monitors''' | |||
* 2 x D&b Audiotechnik MAX 12 | |||
* 2 x Mackie | |||
'''Mic Stands''' | |||
* Hybrid Short Boom Stand | |||
* K&M Short Boom Stand | |||
* K&M Short Boom Stand | |||
* K&M Short Boom Stand | |||
* Straight Mic Stand | |||
* K&M Long Boom Stand | |||
* K&M Long Boom Stand | |||
* K&M Long Boom Stand | |||
== '''Sound Design''' == | |||
'''Car Crash''' | |||
* Car horn (vary pitch in post production) ''Live Recording'' | |||
* Tyres screech ''Live Recording | |||
* Hubcap rolling ''Live Recording'' | |||
* Ambulance siren ''Live Recording'' | |||
* Smash Box ''Studio Recording'' | |||
* Kitchen utensils (pots, pans, etc) ''Studio Recording'' | |||
* Explosion (boom) sound ''Sourced'' | |||
'''Comedy Fall''' | |||
This was created by pinging different lengths/materials of rulers in a studio environment. You will find you get varying levels of "twang" by differing where you first place your finger on the ruler. Enhance this effect by changing things like pitch, length and reverb in post production to imply distance within the effect. | |||
'''Thunder''' | |||
This is a hard effect to recreate, people have misconceptions as to how thunder sounds. I sourced this sound effect but then played about with it during post production changing things like pitch, delay, reverb, varying volume and adding in lower rumble sounds to achieve a fuller effect | |||
'''Doorbell''' | |||
This was done by a live recording in recording studio B. Changed pitch, added reverb in post-production | |||
'''Door Slam''' | |||
This was also a studio recording. A lot of work was done in post-production as door in studio is a solid wooden door, whereas what was required was a large castle type door. | |||
== STAGE MANAGEMENT == | |||
[[File:BackstageDiagram2.jpg|700px]] | |||
[[File:Master Props List.jpg]] | |||
All Props are stored at SLS Props Store | |||
[[File:Sweets2.jpg|300px|left]] | |||
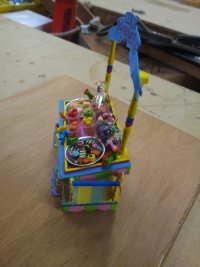
Stage Management were given a model display from the Designer of a sweetie cart and our job was to recreate this. | |||
Using cellophane we made sweetie bags which were filled with real sweets, plastic sweetie jars were sourced from TKMAxx filled with sweets also. | |||
Two wooden circles were cut and covered with tin foil creating a plate effect. | |||
Liquorice Allsorts and Dolly Mictures were made from foam,painted and glued together using a glue gun which worked very well and was used for repairs too. | |||
This sweetie cart had a raked surface which meant we needed to find a suitable way to attach the sweets, using liquid latex and carpet underlay we successfully secured the sweets. | |||
All made sweets, loose sweets around the cart and jars survived the show. They are now stored up at SLS props store. | |||
[[File:ModelSweetieCart.jpg|300px|left]] | |||
[[File:ModelSweetieCart2.jpg|200px|left]] | |||
[[File:Bike.jpg|300px|left]] | |||
Latest revision as of 22:35, 14 March 2013
| Beauty and the Beast Panto 2012 | ||||||||||||||||||
|---|---|---|---|---|---|---|---|---|---|---|---|---|---|---|---|---|---|---|
Beauty and the Beast
| ||||||||||||||||||
Story
When he mocks the advances of beautiful Madame DeTestable, Sasha, the selfish and arrogant Marquis, is transformed into a hideous beast, and only has until the first snowfall of winter to make the plain Belle Atiseau declare her love for him … or he will remain a beast forever. As he hides in his chateau, his servants, Michel and Michelle bring Belle to work for him, and do their best to make him change his arrogant ways. However, Madame DeTestable - with her hapless son, Marcel - have plans to destroy the chateau and everyone in it. But Belle is not alone! With her in the chateau is her bumbling papa, Monsieur Atiseau, her tomboy best pal, Bibi, and Bibi’s mum - the brash, loud and sometimes rude, Bette Bouffant – the woman with the biggest bouffant in all France! Will Madame DeTestable manage to destroy the chateau and all in it? Will Sasha be able to change his ways to make Belle fall for him in time? And will Monsieur Atiseau ever notice Bette’s buffed-up bouffant?
Crew
- Production Manager - Sandy McRobbie (staff)
- Stage Manager - Amber McClelland
- Deputy Stage Manager - Alice McKay
- Assistant Stage Managers - Elleanor Taylor + Julia Perez
- Technical Stage Manager - Rebecca Coull
- Deputy Technical Stage Manager - Andrew McCabe
- Chief Production Electrician - Neil Foulis
- Deputy Production Electrician - Michael Parkin
- Lighting Operator - Oliver Gorman
- Sound Number 1 - Graeme Brown
- Sound Number 2 - Audrey Wilson
- Stage Electricians - Patrick Watson
- Stage Crew - Second year Designers
- Fit up Crew - First Year PTM Students
- Crew Chief - Kev Murray
Fit Up Images
Technical Stage Management
Overview
Stage Plans
Masking
Wings
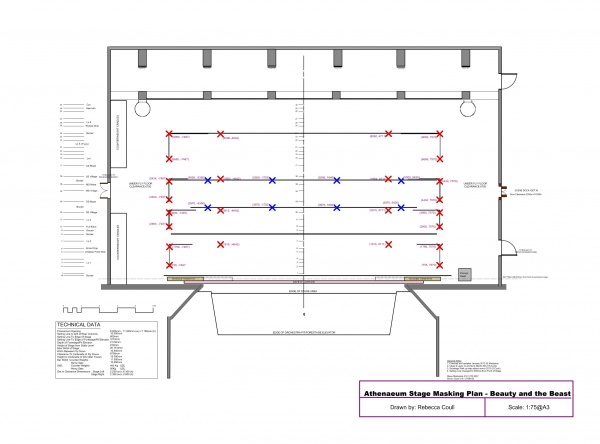
The masking for the panto required that the wings be completely masked, yet quickly and safely accessible for large numbers of cast and large props (e.g. Hairdresser’s chair, sweetie truck); the stage also had to remain quite open.
This was achieved using 4 pairs of doglegs (see Masking plan) the frames were pulled out on hemp lines to the grid and the 4x12 legs tied on. Importantly the dog legs were only tied onstage far enough to mask the entrances and the excess was doubled back.
(Note: There are only 6 dog leg frames in stock – we constructed 2 extra, using scaff and key clamps)
Borders
5 Borders were used for this performance
- Winch Bar – 16x5m
- CW8 – 16x5m (with 1.8m Bar extensions)
- Hemp Bar between CW12 and CW13 – 12.2x3m (On scaff bar made up of two of the 6.4m lengths joined with long key clamp)
- Hemp Bar between CW15 and CW16 – 16x5m (On scaff bar made up to 14m using 3 scaff lengths and two long key clamps)
- CW24 – 16x5m (with 1.8m bar extensions)
All Borders are conduited
Masking Notes
A single 4x8 hard masker (covered in a large piece of black serge tat) was propped up using a stage brace and stage weight. This was to mask the offstage entrance into the USL tower when the door in the tower was used as an entrance and exit offstage. It was placed tight against the tower behind the 3rd soft dogleg masking.
The entrance behind the Door USC in the main tower had a black tat curtain behind it to mask any light spill from void entrance or platform ladder safety lamp.
A 10x3m border was tied along the back of the pit-lift to mask off the main area of the pit and the trap entrance there.
Notable Set Elements
Dungeon Trap and Walk up Treads
A trap was used DSC during the final scene of Act 1; the performer came up from underneath it. It had a standard trap door which was pushed open from below, however under this there was a metal grill as this was supposed to be the entrance to the “Dungeon”. To open it the performer below had to push up through the grill and heave the top door open (the direction then had another cast member pulling open the grill) as this was a bit of a tricky manoeuvre, the cast member was given plenty of time to practice and become comfortable.
Below the trap the walk up treads were used with the long section from the trap down to a 8x4 steeldeck on 982mm legs and down from this the short set of corresponding treads . This was installed by Construction.
Folding Towers
There were three towers in the set which trucked on the stage and folded or unfolded for different scenes.
The tall 5 sided tower set USR opened up into the “Hall”, it was moved by 2 cast members and 1 crew member in costume, to open it was rotated to CS and then opened from there. It was refolded with a cast member inside, so a handle was added by the door to aid his balance.
The 2 DS towers started off as the Chateau Gates with two flown sections completing the “wall”, these were then flown out and the towers folded and taken to each side of the stage, these towers were more tricky to manoeuvre as while they were shorter that the USR Tower, they were heavier and bulkier, also to create the desired effect they had to move together, so required plenty of practice was required. The towers were moved by 1 crew member and 2 cast members to each tower. For the Maze scene in Act 2 the towers were rotated to reveal one side which was painted to look like part of the maze setting.
Flown Elements
Automated Truss
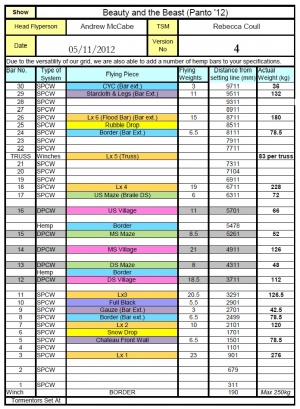
There were two 4m pieces of square truss that were flown on the Automation winches; these were to fly in during the show at different angles for lighting effects.
The Points are from SR to SL (7600,-4200), (7600,-800), (7360,800) & (7360,4200). (Up CL, SR-SL)
The two sections of truss sat upstage above the Chateau, all four winches were required to create the desired effect during flying. However the winches could only sit side by side in the centre section of the grid; as such the truss was slightly staggered in order to fit the winches in. The automation lines ran straight down to the truss and were attached onto the truss by a short strop and the wedge socket. The automation was operated from the flyfloor with a direct line of sight to it from there.
Snow Drop

A vital effect for one of the scenes in the second Act was snow falling downstage, the original plan was to use Snow machines (see Lx) but these ended up being too loud for the scene, TSM was therefore asked to come up with an alternative.
A carpet “bag” was stapled onto two short lengths of wood (one at each end); small grummets were screwed onto these lengths to tie the lines to. The bag was then hung from 4 lengths of sash (2 on each US and DS) on the centre of the counterweight bar. Large slashes were cut into the bag on the DS edge for the snow to fall through. A line was tied to the DS edge and then ran up through small pulleys (the black/grey ones not the bronze ones – they squeek!) to the flyfloor. When the line was pulled the US edge pulled up shifting the snow to the slashes in the bag through where it fell to the ground below.
Equipment Required
- x1.5x1m carpet with slashes in one side
- x2 lengths of wood, roughly 1.5m
- Staples
- x4 Screw on grummets
- x4 1m lengths of sash
- x1 12m length of sash
- x4 small single (black/grey from stock) pulleys
- Cable ties
"Chateau Crumble"
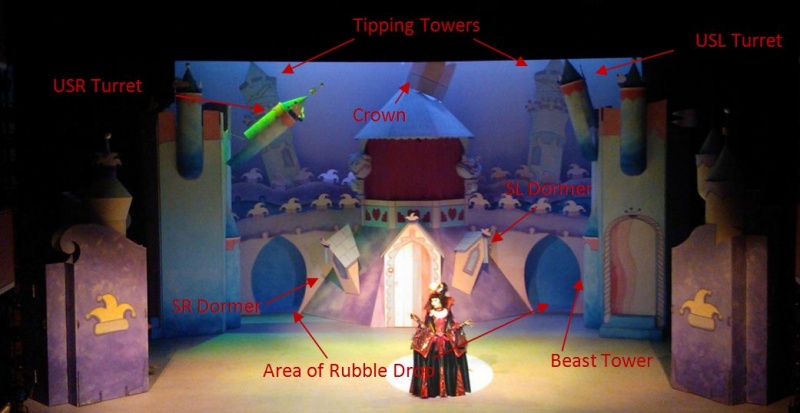
During the final scene of the first Act the Chateau is required to “Crumble” to create this effect some elements of the set fell and wobbled. The image below shows most of the mechanisms and their locations.
Tipping Towers

The towers were simply bolted onto the back of the US Flats as a pivot point; they hit off the bracing behind the flat so could not fall too far. They were also braced to the flat to stop them falling forward of back. We later added a pin to hold them in their upright position until it was required for them to move as a safety. Operated from behind the US flats. (NOTE: door sections in onstage left and right void panels had to be opened.)
Hardware Required
- X1 T-Nut (to screw pin into)
- X1 Bolt screw eye (as pin)
- X1 Round headed bolt (pivot point)
- X1 Square washer
- X1 Nylock nut
USL Turret

The turret fell forward and stopped at an angle, it was hinged off the flat and made in such a way that it wanted to lean slightly forward even when pulled upright. It was held upright by a line which was tied off to the back of it and ran down the back of the flat, it went through one pulley to keep the line neat and was held in the upright position by putting a loop in the line over a cleat. When it was to fall this line was taken off the cleat and let run, it was tied off to a screw eye so the tower could only fall so far. Operated from inside the USL tower.
Hardware Required
- x1 8m length of thin white sash
- x1 pulley block screwed to flat
- x1 hinge
- x2 Screw eye
- x1 small cleat
USL Beast Tower
The tower fell forward onto the beast at the end of the Act, this was operated by the same operator as who let run the USL Turret from inside the USL Tower. It was very simply knocked by there being a small hole in the flat through which was pushed a clear rod which knocked it over, the tower was hinged to the floor with a large T-hinge (a smaller hinge did not work as it ripped easily from the arex – the light material all the turrets and features were made of- if the tower twisted slightly as it fell). We also had a smallholder for the rod made and attached to the flat as we kept loosing it!
Hardware Required
- x1 T-hinge
- x1 clear rod with stopper on one end
USR Turret
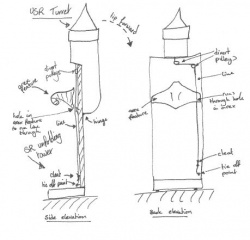
This was operated in much the same way as the USL Tower, with a line cleated then tied off. However the line ran into the USR Tower which during one scene unfolded into the “Grand Hall”; as such the line had to be discrete. We diverted it down close to one of the joins in the flat, we also had to make a small hole in the Arex feature to run the line through, as when it was just run down the join between two features it kept getting trapped.
This was operated by a performer who had been in the tower when it folded back up in the previous scene.
Hardware Required
- x1 8m length of thin white sash
- x2 pulley block screwed to flat
- x1 hinge
- x2 Screw eye
- x1 small cleat
SR Dormer

This dormer window section fell forward, it had a control line that held it in place throughout the rest of the show and stopped it falling too far, however it had to be knocked forward with a push stick. It was operated from inside the leaning flat section on the front of the Chateau.
Hardware Required
- x1 2m length of thin white sash
- x1 pulley block screwed to flat
- x1 cleat
- x1 screw eye
- x1 thin rod with handle to push (we used one of the handles for lifting stage pallets)
SL Dormer
This dormer window section shifted from side to side during the scene. It was very simply operated, set on a pivot point, it was pushed from side to side from inside of the SL of the leaning flat section on the front of the Chateau. Workshop cut a large hole in the flat behind it and screwed a handle onto the inside of the dormer section to push it.
Rubble Drop

During the “Chateau Crumble” scene the director requested rubble to fall from above the castle into the archways on either side of the main Chateau tower. To do this we rigged 4 buckets on 2 trapeze bars (to allow easy resetting – the counterweight bar could not come into a working height due to the tower); from the base of these buckets we ran lines up to the counterweight bar and off to the nearest flyfloor. When these lines were pulled, the buckets tipped and the lightweight “rubble” fell out.
Equipment Required
- x4 Plastic Buckets
- x2 long (12m) lengths of sash
- x10 short (1m) lengths of sash
- x6 small pulleys
- Cable ties
- x4 6m drifts
- x2 1m (roughly) aluminium scaff pipes
- x8 barrel clamps
- x8 1 tonne shackles
- Enough “rubble” to fill all four buckets (stage management source/make)
Pit Bridge
Access was required from the stage straight into the auditorium; as such we put in a pit bridge.
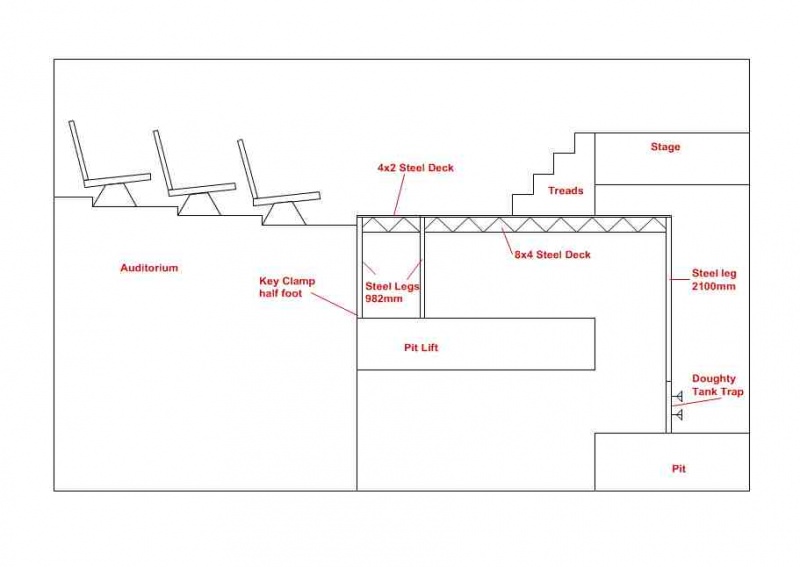
Equipment Used
- x1 8x4 Steel deck
- x14x2 steel deck
- x4 982mm scaff legs
- x2 2100mm scaff legs
- x2 Doughty tank Traps
- x2 Half key clamp feet
- x1 4 step treads (1220 tread width)
- x4 Hinges (to attach treads to front of stage and to Steel deck)
- x2 M10 Bolts and nuts
Electrics
LX Photos
LX Equipment
Generic Lamps
- SL 15-32 - 21
- SL 10* - 4
- SL 19* - 12
- SL 23-50 - 16
- SL 26* - 4
- PARNEL - 1
- 1.2K Fresnel - 33
- 1.2K PC - 8
- 2K Fresnel - 9
- 5K Fresnel - 1
- PAR 64 - 26
- Short nose PAR - 2
- S4 PAR - 54
- Birdies - 10
- Coda FLood - 24
- Starlette baton - 4
- Orion Groundrow - 8
Special Lighting Effects
- Vari Lite 1000 tsd - 4
- 2 Robert Juliet Korrigan 1200W HMI - 2
- Le Maitre MVS Hazer - 1
- Jem ZR44 Smoke Machine - 2
- Look Solutions Viper 2.6 Fog Machine - 1
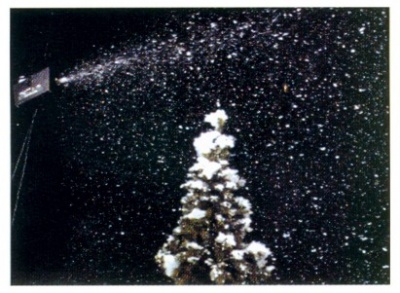
Snow Effect:
The Director requested a snow effect, after much research on foam snow effects, I settled on an affordable option, that looked very effective.
This was Hired from Clyde Productions.
The downside of this affordable option made it very noisy, so unfortunately this was cut from the quiet scene, though still used in the walk down.
Flown LX Truss
This was more of a challenge for TSM, I had to Source the truss for the show, and safely wire up the Ropelight. (power connectors were bought for this from TLC.com) After discussing the truss with TSM, we hung it in a diamond angle, to get more effect from it. The Truss was sourced from Clyde Productions, We used 2 4M sections of 'Metalworx' Truss
Scrollers
The lighting Design for this show called for scrollers, Due to budget myself and another crew member got 6 of the Conservatoires scrollers to work.
Unfortunately some of them broke down during the show some of them broke down, The production manager found LX more money to hire in 2 Scrollers from Blue Parrot, these worked much better.
Decorated Auditorium
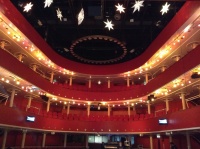
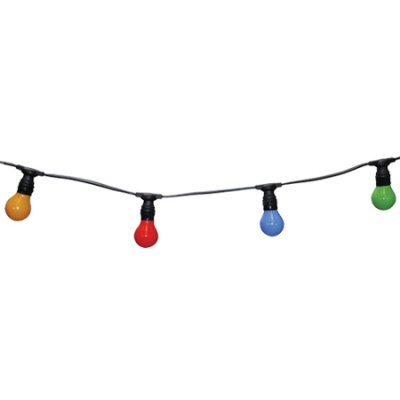
To give the audience a more festive feel, the Lighting Designer decided to decorate the auditorium, with coloured Festoon.
and star shaped paper lampshades from Ikea.
These came with their own fittings, however they were unsuitable for what we needed, so we took the clips,
(that hold the lampshade to the fitting, and in shape) and attached them to pendant fittings from venue stock.
The Festoon Came from Venue Stock, and the Festoon lamps, We borrowed from Scottish Ballet.
Hair dressers Chair
This was a make by Props, and was to be looked after by Electrics. the Diagram below ensured no mistakes in the charging procedure.
Lighting Plan
Designed by Roy Herd
Sound
Provisional Kit List
Cabled Microphones
- 2 x Sennheiser e614 Condenser Mic + clip
- Shure SM57 Dynamic Mic + clip
- Audix D6 Bass Mic
- Shure SM81 Condenser Mic + clip
- D112 Kick Drum Mic + clip
- Shure Beta 57-A Vocal/Instrument Dynamic Mic + clip
- 2 x Sennheiser e604 Drum Dynamic Mic + drum clip
- 3 x Shure SM57 Dynamic Mic + clip
- Shure SM58 Dynamic Mic + clip
- Shure SM58 Vocal Dynamic Mic + clip
DI's
- BSS DI Box 90
- 2 x Behringer Ultra-DI 20
Radio Beltpack Transmitters
- Shure UR1 (BP1)
- Shure UR1 (BP2)
- Shure UR1 (BP3)
- Shure UR1 (BP4)
- Shure UR1 (BP5)
- Shure UR1 (BP6)
- Shure UR1 (BP7)
- Shure UR1M (BP19)
- Shure UR1M (BP20)
- Shure UR1M (BP21)
Band Monitors
- 2 x D&b Audiotechnik MAX 12
- 2 x Mackie
Mic Stands
- Hybrid Short Boom Stand
- K&M Short Boom Stand
- K&M Short Boom Stand
- K&M Short Boom Stand
- Straight Mic Stand
- K&M Long Boom Stand
- K&M Long Boom Stand
- K&M Long Boom Stand
Sound Design
Car Crash
- Car horn (vary pitch in post production) Live Recording
- Tyres screech Live Recording
- Hubcap rolling Live Recording
- Ambulance siren Live Recording
- Smash Box Studio Recording
- Kitchen utensils (pots, pans, etc) Studio Recording
- Explosion (boom) sound Sourced
Comedy Fall
This was created by pinging different lengths/materials of rulers in a studio environment. You will find you get varying levels of "twang" by differing where you first place your finger on the ruler. Enhance this effect by changing things like pitch, length and reverb in post production to imply distance within the effect.
Thunder
This is a hard effect to recreate, people have misconceptions as to how thunder sounds. I sourced this sound effect but then played about with it during post production changing things like pitch, delay, reverb, varying volume and adding in lower rumble sounds to achieve a fuller effect
Doorbell
This was done by a live recording in recording studio B. Changed pitch, added reverb in post-production
Door Slam
This was also a studio recording. A lot of work was done in post-production as door in studio is a solid wooden door, whereas what was required was a large castle type door.
STAGE MANAGEMENT
All Props are stored at SLS Props Store
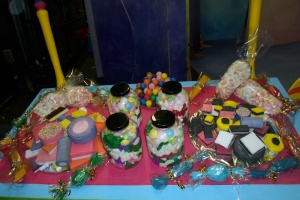
Stage Management were given a model display from the Designer of a sweetie cart and our job was to recreate this. Using cellophane we made sweetie bags which were filled with real sweets, plastic sweetie jars were sourced from TKMAxx filled with sweets also. Two wooden circles were cut and covered with tin foil creating a plate effect. Liquorice Allsorts and Dolly Mictures were made from foam,painted and glued together using a glue gun which worked very well and was used for repairs too. This sweetie cart had a raked surface which meant we needed to find a suitable way to attach the sweets, using liquid latex and carpet underlay we successfully secured the sweets. All made sweets, loose sweets around the cart and jars survived the show. They are now stored up at SLS props store.

